Inspiration
When I started lifting after purchasing a barbell set, thanks dad, the rest was up to me to construct, scavenge, or pray for. Over the years, several pieces of readily available construction hardware have proved to be invaluable for the purpose of quality muscle and strength building. I built my first flat bench with the help of my dad, and at the beginning I also used a couple of oblong furniture crates that served as barbell support stands, short side for benches, then flip em' on end for squats.
During one of my early workouts, the crates tipped over, and the heavy barbell they had been supporting crashed down and creamed the water heater! This was a bad thing, but soon after my dad helped me build very heavy-duty squat/bench racks, and I learned the joy of making quality strength-building equipment.
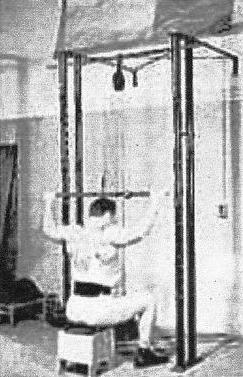
One day, when I was 16 years old, I was flipping through a copy of Strength and Health and I saw a photograph of John Grimek perched on a little wooden box seat doing lat pulldowns in an old York power rack. His lat machine was nothing more than a giant pulley with its hook clamped over a supported chinning bar. One end of the pulley rope was attached to a piece of pipe; the other end of the rope was attached to a weight holder. I thought to myself, “I Gotta get my hands on one of them!”.
Fixated on Grimek's pulley machine, I asked my dad where I could find such a rig. He then looked at the photograph of the machine and said, “Oh, that's a gin wheel.” “A wahhh dad?” “A gin wheel. Roofers use them for pulling materials up to the house peak, and farmers use them for water-well drawing.”
At the time the cost of a quality gin wheel was about $12. “That's about four big lawns mowed,” the old man said. “So you better pull your go-cart apart and put the engine back on the lawnmower and get started.” LOL.
I listened to my dad's advice, and before long I built my own pull-down machine, just like the one Grimek had used. So, now I would like to share with you how to build this marvelous tool for your own training.

The Gin Wheel in Action
Figure A below shows a modern gin wheel, also known as the well wheel pulley—as our mighty farmer can attest to. A typical 10-inch model has a rated weight capacity of 300 lbs; a 12-inch version is generally rated for 750 lbs. On my pulley, I've done repetition work with 225 lbs, which is six 25-lb plates, two 35-lb plates, plus the weight holder.
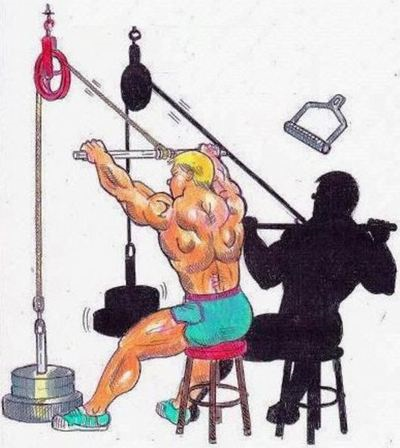
Figure B depicts a sturdy young lifter doing the typical front lat pulldown. Figure C shows a top-down shot of him sitting open legged on a utility stool, just like the great John Grimek performed this exercise. This configuration gives a clear pathway for the payload to pass you. It also keeps the payload from swinging.
Figure D shows a Marine spending his leave doing triceps extensions on his gin wheel. This big pulley is perfect for doing pull-downs for the lats and press-downs for the triceps. For both movements, this apparatus is silky smooth because of the wheel's large diameter. In addition, you can do your pulling or pushing anywhere in a 360-degree radius from the center of the hookup.
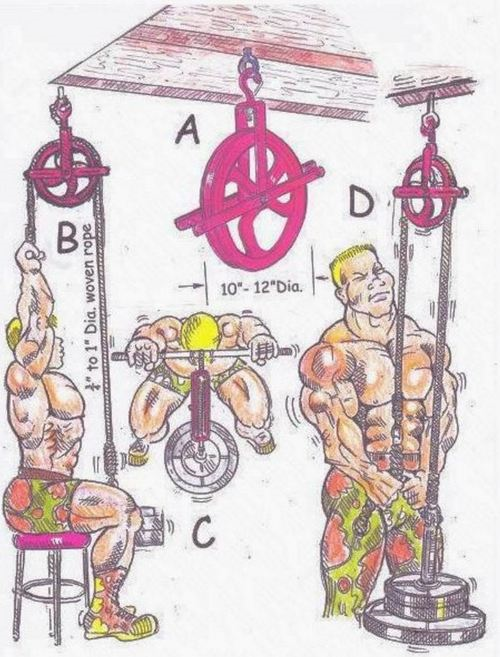
Illustration of a gin wheel converted to a lat machine. Drawing by and courtesy of Chris ‘Sticks’ Bostick.
Finding a Gin Wheel
Finding a gin wheel can be made easy via an internet search. Just Google in “gin wheel”, click on images, and they'll all pop up. Almost all of the wheels are imported, so there is a wide array of prices. Just be sure that the rated work-load capacity is stated and understood before making a purchase. So shop around. In general, the safety standards for heavy lifting equipment are very stringent, so the odds are that you will not be able to lift more than your gin wheel can withstand; but you can try!
So what is the cost of a standard gin wheel? You can find a 10-inch model for $45 to $55, and a 12-inch pulley will typically cost you between $60 and $100. For a pulley rope, I recommend one with a 3/4-inch diameter, woven braid. This is the type of rope used to tie down heavy loads. My set consists of the 10-inch wheel with 3/4-inch diameter rope, and, as I mentioned above, I've had 225 lbs on it without issue. So it should suffice for really heavy home training.
Gin Wheel Attachment
If your home gym set-up includes a power rack with a chinning bar, the top hook of your gin wheel can simply be fastened to the center of the bar. If not, I'd suggest a home set up with wire eye lags (bolts) that screw into the basement or garage ceiling rafters. Figure E shows a 7/16-inch wire eye lag along with his buddy, the 7/16-inch wire eye hook. You can position one or many, depending on portability and strength requirements for your pulley apparatus. Typical cost for a 7/16-inch wire eye lag is about $2.
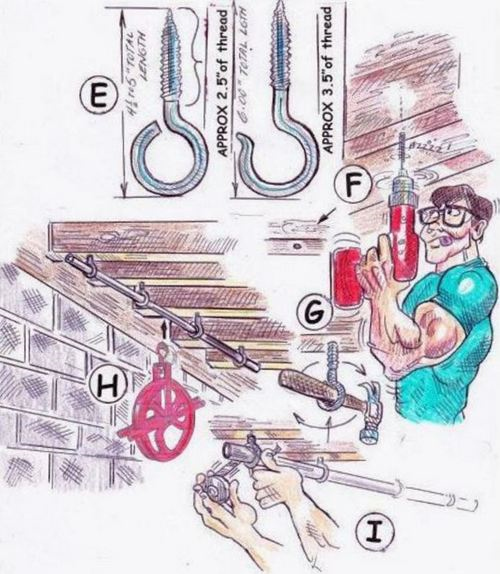
Your gin wheel can be directly supported by a threaded eye bolt or by a hanging chinning bar. Drawing by and courtesy of Chris ‘Sticks’ Bostick.
Before installation of your eye lags, find and mark your rafter spots with a Sharpie. Then, at each spot, drill dead center into the rafter a two-inch deep pilot hole with a 1/4-inch drill bit (Figure F). Prior to drilling, mark the drill bit with a Sharpie at the two-inch mark to be sure of the depth.
After drilling the pilot holes, it is time to insert the eye lags. To insert an eye lag, first wet its threads with wood glue. Then, twist the eye lag by hand to get it securely in place. Once it is in place, put a tool handle or strong rod (Figure G) through the loop of the eye lag and twist it farther into the rafter until you bury the entire threaded section. This method will ensure a super strong connection, one which can support at least 250 lbs.
You can end your ceiling hook-up with a single eye lag, or put three more in line (Figure H) and snake a 3/4-inch nominal (1.050 inch actual diameter) piece of pipe, 4 1⁄2 to 5 feet long, through the four lag loops for a chinning bar. If you do this, then tape the two end sections with friction tape to secure the bar (Figure I). Follow by hooking your gin wheel over the chinning bar.
Lat Bar and Weight Holder Attachments
There are lots of hook-up options available for lat bar attachments. My recommendation is to use a three or four foot length of nominal 1-inch galvanized pipe (1.315 inch actual diameter) threaded on both ends (Figure J). For a little pizzazz, you can paint a pair of matching sweat caps red for finishing off the ends. Also purchase two carabiners (Figure J1, metal loop with a spring loaded gate) and a heavy-duty hose clamp with a 2 1⁄2-inch inside diameter (Figure J2). Clip your hose clamp inside the carabiner and snake it over the end of your lat bar finding the center. Then crank that sucker down tight with a box wrench. Finally, take your friction tape and tape over, around and through the junction. One and DONE!
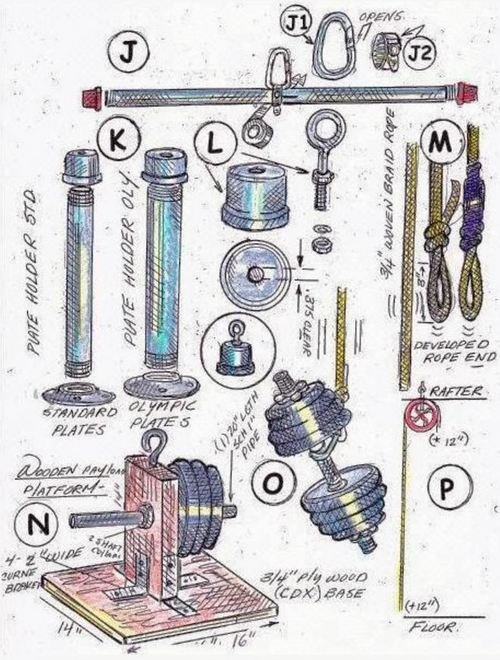
There are many excellent and inexpensive ways to make a lat bar attachment and a weight holder for your new lat machine. Drawing by and courtesy of Chris ‘Sticks’ Bostick.
Figure K shows a standard-plate weight holder made with a 12-inch length of nominal 3/4-inch pipe (1.050 inch actual diameter) threaded on both ends, a matching pipe cap on top, and a matching floor flange on bottom. In addition, this figure illustrates an Olympic weight holder made with a 12-inch length of nominal 1 1⁄2-inch pipe (1.900 inch actual diameter). For the standard setup expect to pay about $7 for the pipe cap, about $8 for the floor flange, and about $9 for the 12-inch pipe, threaded at each end. Cost will be only slightly more for the Olympic setup.
As depicted in Figure L, a 3/8-inch clearance hole is bored in your pipe cap on center. Insert a 3/8-inch eye bolt, approximately 3 1⁄2 to 4 inches long (~$2.00), through the bored hole. Apply a nut to the top side of the eye bolt, drop a 3/8-inch lock washer on the underside, and counter with another 3/8-inch nut. Then crank both nuts tight.
To determine the length of rope your new setup requires, you will need to take into account the distance from the pulley to the floor and the distance around the pulley (see Figure P). Add an additional foot of rope on each side for end developing. As an example, if you measure 90 inches around the pulley and to the floor, add an additional 24 inches for a total of 114 inches. Better to get the rope too long than too short. You can always cut a long rope to optimum length.
As depicted in Figure M, loop your rope ends and double knot each one forming about a three inch opening loop for each end attachment. Grab your trusty friction tape and tightly tape the extra rope tail tight against the rope above the second knot. You may have to play with the lengths and loops a little bit before you do your final tape job.
Figure N shows a little pipe alternative using some lumber and our old 7/16-inch wire eye lag. Oh, and Figure "O"! Jhadbd. No, it's not a new terrorist group; just hang a dumbbell, dude. LOL.
Figure Q below shows a few more weight-holder options.

Here are a few additional payload possibilities for your wheel-well pulley. Drawing by and courtesy of Chris ‘Sticks’ Bostick.
Pulldown Variations
Okay, once you get done building your new gin-wheel pulley, its time to put it into productive use. Of course, its perfect for performing standard lat pulldowns and triceps pressdowns. For a little variation, try the 45-degree pulldown. This is a combination of a lat pulldown and a cable row. This movement is great for building the upper back. It also is fantastic for beefing up the shoulders without dead-hang stress on battered rotator cuffs. For a cool twist, try one-arm pulls with a single cable handle.
Well, that's it for now; I've got to go press. Stay tuned for further installments on Muscles of Iron, and remember, if we can draw it you can build it!
Add Comment